
Waterfall season got a late start this year, but it is finally underway. I have been on a roll lately, checking hikes off my list that have been tugging at me for years. And once the steady rains hit the Natural State, I got to start checking off some more. At the top of my list this waterfall season was the Hike to Thunder Canyon Falls. I actually tried to do this one last Winter. But I had not done my homework and was unprepared for creek crossings, or even reaching the trailhead. Since then I’ve had trouble getting back there after the right amount of rain. That is until December, 2021. When the rains finally hit, I was ready for this one.
I enjoy all of the waterfalls that I hike to. But there is something different about Thunder Canyon. To me, there’s a certain mystique about it. Maybe because the trailhead itself is harder to reach, so fewer people go there. Maybe it’s the unique hike up the slot creek leading up to the falls. Or maybe it’s just the cool name “Thunder Canyon” that sets an expectation and pushes the adrenaline button. This mystique was there even before I got to see it for myself. So when I finally got to make this hike happen, Thunder Canyon did not disappoint.
Quick Glance
Distance: Approx 3.5 miles round-trip, out and back
Difficulty: Moderate
Parking/Trailhead: 36.083655, -93.233432
Thunder Canyon Falls Coordinates:36.08459, -93.25427
(Copy/Paste Coordinates into GPS or Google Maps search bar)
Directions
There are several different ways to reach the trailhead and none of them are great. The shortest way is to take Erbie Rd/CR19 from Compton like you’re going to Hideout Hollow. But from everything I’ve read, you usually need 4WD to get down this road. I’ve taken it to Hideout Hollow and can attest that it is rough and muddy. If gets any worse than what I saw (by all accounts, it does), then I wouldn’t go this way. Another way involves taking Erbie Campground Rd and driving across the Buffalo River if it’s low enough. If the Buffalo is that low, then there may not be much water in the falls. So why bother? I’ve never taken either of these routes. So for the purpose of this article I’ll just describe the only route I’ve taken.
The route I’ve taken twice involves coming in on Erbie Rd/CR19 on the north side of Cecil Creek. There are two ways to do this. The first is from Hwy 7 about 5 miles south of Harrison, head west on Hwy 206. On 206, drive west 2 miles and turn left on Erbie Cutoff Rd. This is a nice paved road that will eventually turn into Erbie Rd/CR19, where you will turn right. The other way is to take Erbie Rd directly off Hwy 7 just across the road from the deserted Dogpatch theme park. Both of these routes take you to CR19, a rough gravel road that leads all the way to Cecil Creek. From there, you’ll have to decide if you can drive across Cecil Creek. I did it in my truck without 4WD. But if the creek is too high, park here and walk 0.6 miles to the trailhead.


What to Expect
The Hike
The hike to Thunder Canyon Falls was easier than I expected. It is approximately 3.5 miles round trip, out-and-back. You start off on the Cecil Cove Loop trail. This is a wide, well-trafficked trail that’s easy to follow. The first half-mile is a gradual descent until you reach Cecil Creek. So the last part of the hike will be uphill, but it’s not too steep. Aside from that section, the trail is mostly level. There are a few water crossings, which I’ll describe below. I would rate the Cecil Cove Trail section of this hike as easy. But once you leave that trail to head up into Thunder Canyon, things get a little tricky. I’ll also expand on that below, so keep reading. But for that reason, I rate the overall hike as moderate.
Water Crossings
Before we get to Thunder Canyon, we have to cross some water. The Cecil Cove Loop trail follows Cecil Creek pretty closely. On the day I hiked, there were three water crossings, but that will vary based on recent rainfall. The first crossing comes at just under .5 miles in. There’s a pool of water just before you get to Cecil Creek. I was able to rock hop this one and not get wet. But if it was much higher, that would not be the case. After that, follow the trail to the left and continue to the 1-mile mark, where the trail crosses Cecil Creek.
The second water crossing was the deepest. It was less than knee-deep, but I could see this getting much deeper after a hard rain. I looked for other places along the creek to rock-hop across but was unsuccessful. But that’s OK because trying to cross the creek too far off the trail will result in a pretty rough bushwhack. After this crossing, it’s about a half-mile to the next one. I got lucky and was able to rock-hop across the third crossing without removing my boots. But again, you probably won’t be that lucky there if the water is any higher. Be sure to watch the video below where I show you all three crossings.


Thunder Canyon
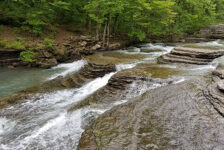
After the 3rd water crossing, turn left at the fork to break off from Cecil Cove Loop trail. From here, a new trail will follow the creek that leads up into Thunder Canyon. The further up it you go, the tighter this canyon gets. The walls and slopes of the canyon are steep and gradually squeeze you closer to the creek. Simultaneously, the creek bed turns from loose creek rocks to solid stone slabs. And the water has carved a slot in these rocks forming a slot canyon, or slot creek.
This is where the hike gets tricky. For one thing, the trail dead-ends due to the canyon walls. So you have to cross over the slot creek, follow the trail on the other side, and then cross back again. The second thing is that the banks of the slot creek are solid rock, and are very wet and slippery. This is what bumps the difficulty level up to moderate. And it’s why I HIGHLY recommend hiking poles. I have short legs and great balance, but I slipped and fell here. Not a bad fall, but I’m telling you, it’s super slick!
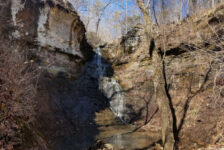
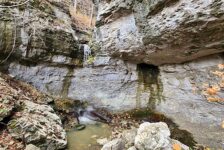
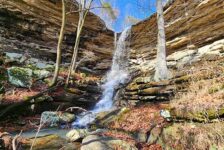
The slot creek is a really cool sight to see, so take your time. It will eventually bend to the right and into a narrow box canyon with high stone walls that go straight up. This is Thunder Canyon. It looks like a place where you’d see elves or hobbits running around. And when you round the bend, you’ll catch sight of the waterfall at the end of it. At this point you’ll know you’re looking at one of the most interesting and impressive waterfalls in the Ozarks. The water comes crashing down through the cliffs of the canyon, winding it’s way to a pool at the bottom. Cliffs and rock overhangs hide the top of the falls from sight. It’s one of the most unique waterfalls for sure, and lands squarely in my top 3 favorites.
Alternate Routes
Without getting into too much detail, there are a couple of alternate routes worth noting. The first is an alternate trailhead. You can begin your hike to Thunder Canyon Falls by starting at Paige Falls. That drainage flows through Broadwater Hollow and runs into Cecil Creek, where you can hit the Cecil Cove trail. It’s probably a mile longer, but you get to see two more waterfalls. I plan to do this hike sometime soon. The other alternate route involves skipping the creek crossings on the hike I took. This route is a bushwhack up the hill on the south side of Cecil Creek. I met a nice couple on the trail that took this route on their way back. I don’t know the details or difficulty other than it was a bushwhack with no trail. But it’s an option you can explore if you insist on not crossing the creek.
Plan Your Trip
Give yourself at least 2.5 or 3 hours to Hike to Thunder Canyon Falls. That doesn’t include the drive each way down the long gravel roads. So depending on where you’re coming from, this hike can take up most of your day. There is a pit toilet at the trailhead if you need it. I don’t recall if there was any cell signal, because my eyes were occupied with the scenery around me. But I can tell you that dogs are not allowed. This is Buffalo River NPS territory. Even if it weren’t, it would be a slick, sketchy hike for a dog.
You absolutely want at least one hiking pole and waterproof hiking boots for the hike to Thunder Canyon. I also recommend taking some creek shoes and extra socks. This is a place you’ll want to pack some drinks and snacks. Don’t give yourself any reason to want to leave early. In fact, I suggest getting there early, take a hammock, and enjoy the area. Just be prepared to pack out whatever you take in and leave no trace. I can’t stress it enough – this place is an absolute treasure. Let’s keep it that way. Take nothing but pictures and leave nothing but footprints, and enjoy the hike.