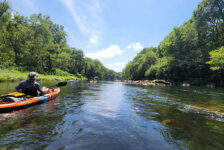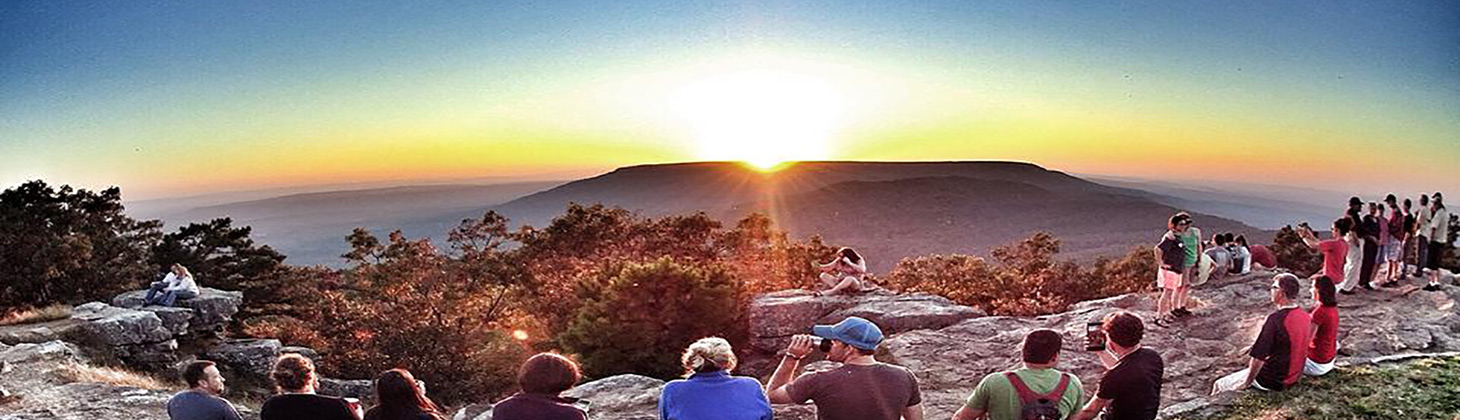
One of my favorite ways to experience the rivers in Arkansas is with an overnight float trip. I’ve done several of these, and my most recent overnighter was South Maumee to Rush on the Buffalo River. All of the lands bordering the Buffalo River are public lands owned by the National Park Service. This makes the Buffalo one of the few rivers in Arkansas where you can camp almost anywhere along the entire river. Maumee to Rush is located on the lower Buffalo, making it floatable – usually – well into July.
I love overnight floats because I don’t have to worry about the campgrounds filling up or trying to find a site. I don’t have to worry about getting off the river at a certain time to catch a shuttle. And when I do come off the river I don’t have to drive anywhere. I love being able to float all day and just stop wherever I want to set up camp. But most of all, how can you not love camping out on a riverbank far away from civilization? The stars are brighter. There are no noisy neighbors… or campground rangers telling you to keep the noise down. You may sacrifice some conveniences such as running water or electricity that many campgrounds offer. But I like camping that way, and the trade-offs are well worth it.
Quick Glance
Distance: 18.2 miles
Difficulty: Easy
South Maumee Access Coordinates: 36.039331, -92.635969
Spring Creek Access and Campground (4.7 miles): 36.030154, -92.585209
Dillards Ferry Access (9.3 miles): 36.066920, -92.578330
Buffalo Point Access and Campground (10.7 miles): 36.070621, -92.555134
Rush Landing Access and Campground (18.2 miles): 36.124422, -92.549049
(Copy/Paste Coordinates into Google Maps search bar)
Directions
I recommend getting a shuttle for this one. But if you want to self-shuttle, the put-in at South Maumee is located 24 minutes north of Marshall. From Hwy 27, 5.4 miles north of Marshall, head north on South Maumee Rd (Co Rd 52 on Google Maps). Drive 6.8 miles and it dead-ends at the river access.
To reach the take out at Rush, continue east on Hwy 27. Turn left (north) on Hwy 14 towards Yellville. You’ll pass right by Crockett’s Canoe Rental. Just after crossing the Buffalo River at Dillard’s Ferry, you’ll pass Wild Bill’s Outfitter on the corner of Hwy 14 and Hwy 268E. A right turn there will take you to Buffalo Point Campground. Continue up Hwy 14 until you see Buffalo River Float Service on the left. If you’re coming from Yellville, it’s on the right. Across from that is Marion County Rd 6035. Follow that road until it dead-ends at Rush Landing.
After dropping a vehicle at Rush, it’s a 50-minute drive down to the put-in at South Maumee. Keep in mind, you’ll have to do this again to pick up your vehicle at Maumee when the float is over. This is the reason I recommend shuttling with a local outfitter. Yes it costs more, but it’s worth it for the time saved. Most of them will pick up your vehicle at Maumee and park it for you at Rush.
What to Expect
The Float
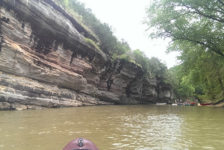
The float from South Maumee to Rush on the Buffalo River is 18.2 miles. That’s a long float for one day, but perfect for an overnighter. If you don’t want to overnight it, there are three other access points in between South Maumee and Rush. Spring Creek, Dillards Ferry, and Buffalo Point give you plenty of options to customize your float. The coordinates and distances from South Maumee are listed in the Quick Glance section above. I would rate this float as extremely easy. American Whitewater rates it as Class I-II, but I never saw anything even close to Class II rapids. We did the float at 5.5 feet on the gauge and it was one of the most laid-back floats I’ve ever done. At that level, the flow is really good and we never dragged. We cruised at a nice pace without ever paddling, except one short section at the end. I mentioned this several times throughout the video below.

Scenery
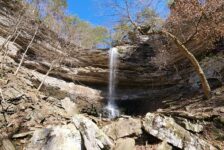
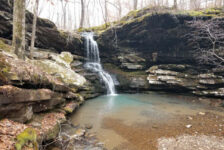
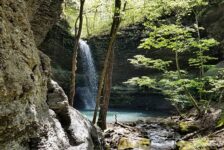
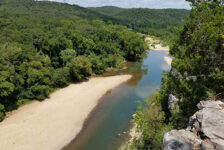
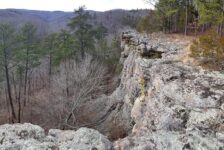
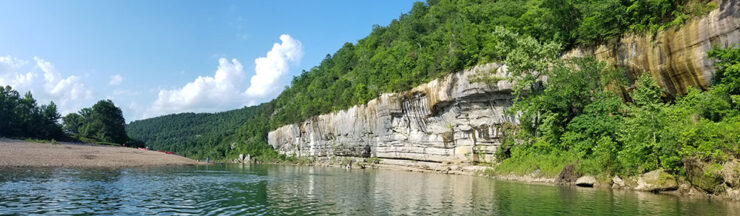
Maumee to Rush on the Buffalo River is a very scenic float. The last leg of this float – Buffalo Point to Rush – is the last section before the long stretch to Buffalo City. There are lots of huge, beautiful bluffs to see on the Lower Buffalo. But there is a noticeable difference between these bluffs and those of the Upper Buffalo. The bare-faced bluffs of the Upper seem to rise right out of the water, towering above you as you float by. Whereas many of the bluffs on this section are off the river a bit and seem more distant. There are also more trees on these that hide some of the rock formations. But make no mistake, these bluff are gigantic and make for some spectacular scenery.
This is also a great section of the river for smallmouth bass fishing. My buddy Jasen Shamlin was along for this float, and he is the self-proclaimed “World’s Greatest Paddleboard Smallmouth Bass Fisherman”. It’s a very niche title, but hard for me to argue. You can catch him reeling in a couple of nice smallmouth bass in the video below. If fishing isn’t your thing, just kick back and cruise. But keep an eye out for bald eagles. We saw one about a mile before Rush. There are several in the area between there and the White River.


Do’s and Don’ts For An Overnight Float
If you are going to overnight float from Maumee to Rush on the Buffalo River, you need to prepare for it. You don’t just wake up one day and decide to go. It takes a little planning and prep. I get into this in my other overnight float article here here, but I’ll expand on that below.
Gear
Space on your kayak is limited, so it is essential to pack light and efficiently. Weight is also important. The more weight that’s on your boat, the less stable it is. Food and drinks are top priority. Decide how much room you need for that, then figure out from there what gear you can take. Next on the list is either a tent, or hammock and tarp. If it’s still cold, you’ll need a sleeping bag. What cooking supplies do you still have room for? Check our paddling gear list to make sure you’re not forgetting anything. Finally, you will need a large dry bag. Keep dry clothes, a towel, and some food in there.
To save space, you might have to get creative. One thing I do is treat it like an overnight hike. I use my backpacking gear because it has all I need packed into my backpack. Then I drop that into a giant trash bag to keep it dry. Arrange your gear in your kayak at home to make sure it will fit. If not, coordinate with your group on things you can share so you don’t all bring the same thing. (You only need one camp stove, certain cooking supplies, etc). Hopefully someone in your group will be rocking a canoe or standup paddle board. You can pack a lot in one of those which allows for a few more conveniences. For ideas on arranging gear on your kayak, see my video below.
Packing
If your kayak has any dry storage, try to put as much as you can in there. But anything you’ll use often (sunscreen, coozy, etc) should be left out where you can easily access it. Put the rest in your dry bag and coolers, and strap or bungee those down. The night before the float, I prep as much food as I can. I dice potatoes for Day 1 dinner and put them in a foil pack. I brown sausage and scramble some eggs and foil pack those. Then I can just throw these packs on the fire or camp stove.
Food is important. It does you no good if it’s spoiled or waterlogged. So it needs to stay cold and dry until the end. You’ll figure out your system, but here’s how I do it. I have a 3-day cooler packed with frozen water bottles. Large chunks of ice last longer than small ice cubes. These double as drinking water. This cooler will hold Day 1 Dinner, Day 2 breakfast and lunch, and drinks. All food and foil packs go into ziplock bags to keep them dry. I do a bottom layer of frozen water bottles. The next layer is Day 2 lunch and breakfast and some bagged ice. A few more frozen water bottles on top of that along with some drinks. And then Day 1 dinner with more bagged ice on top. Pack it completely full, filling all spaces with bagged ice. Less air in the cooler helps your ice last longer. Leave this cooler CLOSED. Then pack a small cooler for Day 1 lunch and drinks so you don’t have to open the main cooler. For multi-night trips, look into using dry ice.
Picking a Camp Site
When it’s time to find a camp site, there are some things to keep in mind. First, camping on the river banks is not allowed within 1/2 mile up or downstream of a Buffalo River NPS campground. So it’s a good idea to know where those are. Next, I recommend finding a spot where the river is moving fast. Stagnant water attracts mosquitos, and you don’t want that. Plus the sound of rushing water is great for sleeping. Speaking of sleep, If you are hammock camping, look for a spot with trees that can hold your hammock up. And speaking of trees, shade can be pretty handy. So consider which direction the sun will set and rise, and where your shade will be.
Here’s the most important thing, so please read this. Choose a site that allows you to escape to higher ground if the river were to rise overnight. Hopefully you watch the weather and choose a sunny weekend. But sometimes the weather folks get it wrong and storms pop up out of nowhere. Even if the storm isn’t right over you, if its upriver, it can cause the river to rise on you. The Buffalo can rise to dangerous levels very quickly. Yes, it happens. And yes, people have paid dearly for it. With that in mind, island gravel bars in the middle of the river are a bad idea. So is camping next to a large bluff. Being trapped between a rising river and a large bluff is not ideal. So pick a spot where you can get to high ground if necessary.
Plan Your Trip
The great thing about Maumee to Rush on the Buffalo River is that it’s almost always floatable. But it’s still a good idea to check the river level on American Whitewater. They say the ideal float range is 3.5 – 9.0 ft on the gauge. I don’t recommend doing this float if it’s less than 3.5 feet if you are overnight floating. You don’t want to drag with all that gear! Give yourself around 11-14 hours to do this float, depending on the flow. As I mentioned, I recommend using a outfitter to shuttle this one. But if you do self-shuttle, get an early start because there will be a lot of driving.
If you need anything from town, Marshall is the closest one to Maumee. Yellville is the closest one to Rush. You might want to review this Buffalo River map (choose the Brochure Map option) to get familiar with all the access points. Cell service in this area is spotty at best. Dogs are allowed on the river but glass is not. NO GLASS of any kind! Remember your PFD and trash bag, and please do your part to leave no trace. Watch the weather and water levels, and be safe out there. See ya on the river!