As float season gets underway, the businesses along Hwy 65 between Marshall and St. Joe are getting into their busy season. Paddlers of all kinds will flock to this beloved area by the thousands for a fun day on the Buffalo River. A majority of folks floating in this area will do Tyler Bend or Grinder’s Ferry to Gilbert. It’s one of the most popular sections of the Buffalo due the ease of shuttling. But what does the Buffalo River look like after Gilbert? The next take-out after that is Maumee, and most people never see this 12-mile section. It’s been one of the few sections of the Buffalo left on my to-do list. So to start the 2023 float season, we did an overnight float from Grinder’s Ferry to South Maumee.
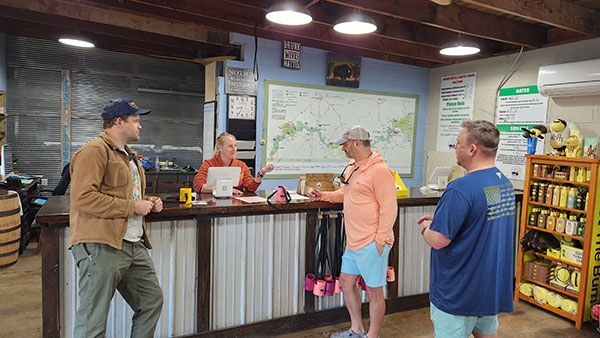
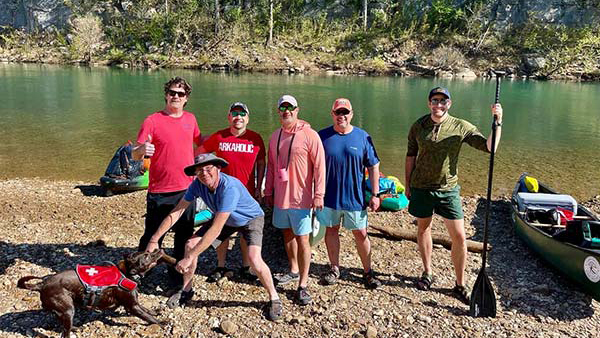
You may be asking, “What’s the deal with this section? Why don’t more people float it?”. Well, it’s a simple matter of logistics. Driving from North or South Maumee access points to Grinder’s Ferry is nearly 40 minutes each way. So it’s a fairly expensive shuttle for the busy outfitters along Hwy 65. And it’s a long way to self-shuttle. I am one that is normally all for self-shuttling. But there comes a point where the driving time isn’t worth the savings. So for this float, our new friends at Crockett’s Canoe Rental* helped us out with a shuttle. From their location on Hwy 14 in Harriet, it’s only a 28 minute drive to Grinder’s Ferry. Score! On this float I would be joined by my usual floating pals, David, Eric, and Neil. And of course, our special guests Gez Rogers and Super Leeds of Waterfalls in AR & Other Cool Places. What a crew!
* NOTE: This is NOT a paid or sponsored article. We did get a good deal from Crockett’s, but we were paying customers.
Quick Glance
Distance: Approximately 16 miles
Difficulty: Easy
Points of Interest Coordinates:
Crockett’s Canoe Rental: 35.993635, -92.520354
Tyler Bend Access: 35.989258, -92.766767
Grinder’s Ferry Access: 35.984702, -92.744279
Shine Eye Access: 35.987979, -92.734507
Gilbert Access: 35.986922, -92.715126
Red Bluff: 36.012123, -92.686486
South Maumee Access: 36.039100, -92.636431
Spring Creek Access: 36.030189, -92.585005
Dillard’s Ferry Access: 36.066749, -92.577271
(Copy/Paste Coordinates into GPS or Google Maps search bar)
Directions
For anyone insisting on self-shuttling, Grinder’s Ferry Access is located right off Hwy 65 right where the bridge crosses the Buffalo River. Northbound from Marshall, turn right on Grinder’s Ferry Rd just before the Hwy 65 bridge. To reach South Maumee, take Hwy 27 northeast out of Marshall for 5.5 miles. Turn left on S Maumee Rd and stay on it for 6.8 miles all the way to South Maumee Campground. When you reach the access point, DO NOT drive too far onto the gravel bar without 4WD. It’s easy to get stuck here. For other float options, coordinates for all the access points between Grinder’s Ferry and Dillard’s Ferry are listed above.
I highly recommend ignoring the previous paragraph and arranging a shuttle for this float with Crockett’s Canoe Rental. You’ll want to call ahead for sure. To get to Crockett’s , continue on Hwy 27 out of Marshall, past S Maumee Rd. for another 5 miles. Where Hwy 27 intersects with Hwy 14, you’ll find Crockett’s right there in the curve. You can find all this in the Google Map below.
What to Expect
Our original plan was to float the lowest section of the Buffalo, Rush to White River. Those plans changed with the threat of thunderstorms in the forecast. That section is 25 miles with no take-outs — not the place you want to be stuck on the river in a storm or flood. So we opted to go upriver for this float where we had some take-out options if the weather got bad. Plan B was to float from Hwy 65 Bridge to the Hwy 14 Bridge (aka Dillard’s Ferry), which is a 3-day/2-night float. This plan would also go awry once we confirmed the storms rolling in on Day 2. And so South Maumee had become our take-out destination.
The Float
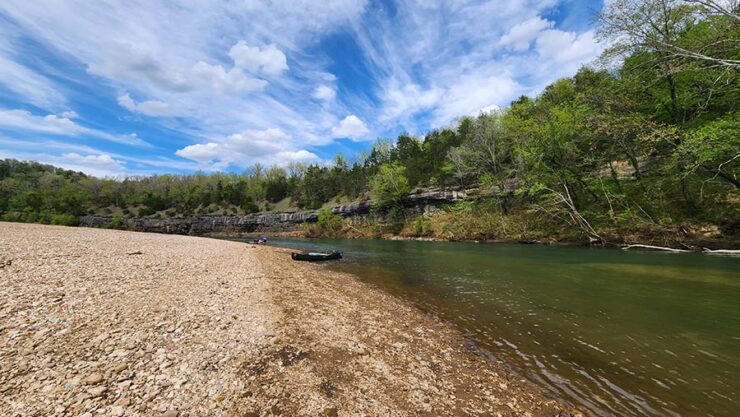
Grinder’s Ferry to South Maumee is a 16.4-mile float. On the day we started, the river level was at 5.1 feet on the Hwy 65 Bridge gauge, with a flow of 860 cfs. At that level, the entire float took us 9 hours. But we made several long stops and we barely paddled at all. There was enough flow that we could just sit back, steer, and enjoy a lazy float. At lower levels, it might take a bit longer. As far as difficulty goes, this is a very easy float. There are several shoals but only 1 section that I would call rapids. And those are barely Class I, if that. So this is a float that anyone can do…that is if you don’t mind a 16-mile float.
Scenery
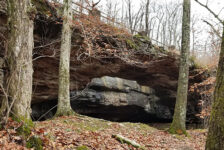
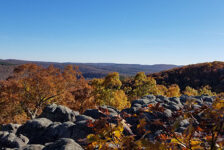
Like all the other sections of the Buffalo River, Grinder’s Ferry to South Maumee is not lacking in scenery. Starting with the bluff caves around Shine Eye campground and swimming hole. As well as the bluff cave you can paddle under. The Buffalo River is well known for it’s beautiful bluffs that rise high above the water. And this section of the river certainly has plenty of those. The most popular one you’ll see is the Red Bluff Overlook. This is a popular spot for hikers to get photos of the Buffalo as it makes a horseshoe bend right in front of the overlook. Since this section does get less river traffic, you’ll find that it’s much more quiet. And the fishing is pretty decent too. Be sure to watch the video below for all this, AND a shot of a couple of bald eagles!


Tips For An Overnight Float
An overnight float takes some careful preparation. You don’t just wake up one day and decide to go. It takes a little planning and the proper gear. I get into this in another overnight float article here here, but I’ll expand on that below. (Yes, I’m recycling the sections below from my Maumee to Rush article. Because I’m efficient like that.)
Gear
Space on your kayak is limited, so it is essential to pack light and efficiently. Weight is also important. The more weight that’s on your boat, the less stable it is. Food and drinks are top priority. Decide how much room you need for that, then figure out from there what gear you can take. Next on the list is either a tent, or hammock and tarp. If it’s still cold, you’ll need a sleeping bag. What cooking supplies do you still have room for? Check our paddling gear list to make sure you’re not forgetting anything. Finally, you will need a large dry bag. Keep dry clothes, a towel, and some food in there.
To save space, you might have to get creative. One thing I do is treat it like an overnight hike. I use my backpacking gear because it has all I need packed into my backpack. Then I drop that into a giant trash bag to keep it dry. Arrange your gear in your kayak at home to make sure it will fit. If not, coordinate with your group on things you can share so you don’t all bring the same thing. (You only need one camp stove, certain cooking supplies, etc). Hopefully someone in your group will be rocking a canoe or standup paddle board. You can pack a lot in one of those which allows for a few more luxuries. For ideas on arranging gear on your kayak, see my video below.
Packing
If your kayak has any dry storage, try to put as much as you can in there. But anything you’ll use often (sunscreen, coozy, etc) should be left out where you can easily access it. Put the rest in your dry bag and coolers, and strap or bungee those down. The night before the float, I prep as much food as I can. I dice potatoes for Day 1 dinner and put them in a foil pack. I brown sausage and scramble some eggs and foil pack those. Then I can just throw these packs on the fire or camp stove.
Food is important. It does you no good if it’s spoiled or waterlogged. So it needs to stay cold and dry until the end. You’ll figure out your system, but here’s how I do it. I have a 3-day cooler packed with frozen water bottles. Large chunks of ice last longer than small ice cubes. These double as drinking water. Day 1 Dinner, Day 2 breakfast and lunch, and drinks go in this cooler. All food and foil packs go into ziploc bags to keep them dry. I do a bottom layer of frozen water bottles. The next layer is Day 2 lunch and breakfast and some bagged ice. A few more frozen water bottles on top of that along with some drinks. And then Day 1 dinner with more bagged ice on top. Pack it completely full, filling all spaces with bagged ice. Less air in the cooler helps your ice last longer. Leave this cooler CLOSED. Then pack a small cooler for Day 1 lunch and drinks so you don’t have to open the main cooler. For multi-night trips, look into using dry ice.
Picking a Camp Site
When it’s time to find a camp site, there are some things to keep in mind. First, camping on the river banks is not allowed within 1/2 mile upstream or downstream of a Buffalo River NPS campground. So it’s a good idea to know where those are. Next, I recommend finding a spot where the river is moving fast. Stagnant water attracts mosquitos, and you don’t want that. Plus the sound of rushing water is great for sleeping. Speaking of sleep, If you are hammock camping, look for a spot with trees that can hold your hammock up. And speaking of trees, shade can be pretty handy. So consider which direction the sun will set and rise, and where your shade will be.
Here’s the most important thing, so please read this. Choose a site that allows you to escape to higher ground if the river were to rise overnight. Hopefully you watch the weather and choose a sunny weekend. But sometimes the weather folks get it wrong and storms pop up out of nowhere. Even if the storm isn’t right over you, if its upriver, it can cause the river to rise on you. The Buffalo can rise to dangerous levels very quickly. Yes, it happens. And yes, people have paid dearly for it. With that in mind, island gravel bars in the middle of the river are a bad idea. So is camping next to a large bluff. Being trapped between a rising river and a large bluff is not ideal. So pick a spot where you can get to high ground if necessary.
Plan Your Trip
Under ideal river conditions, Grinder’s Ferry to South Maumee could be done in a day if you paddle a lot and don’t stop too much. But if you really want to enjoy the river, plan on making this an overnight float. This is a section of the Buffalo that is often floatable deep into the Summer. But it’s always a good idea to check the river level on American Whitewater. They say the ideal float range is 3.5 – 9.0 ft on the gauge. As I mentioned, I recommend using an outfitter to shuttle this one. And I would use Crockett’s Canoe rental due to their location. But also because they are fantastic people and a lot of fun to work with. I also recommend planning this float during off-peak times to make it easier to schedule that shuttle.
If you need anything from town, Marshall is the closest one to Maumee. And the cool thing about this float is that you float right through the small town of Gilbert. The Gilbert General Store is there with limited food and supplies if you need it. You might want to study the Buffalo River map (choose the Brochure Map option) to get familiar with all the access points. Or review the River Mileage Chart to help plan your float. All river access points have camp sites if you’re not comfortable with gravel bar camping. And there are tons of cabins in the area for rent if camping isn’t your thing. Crockett’s has a good list of those to get you started here. Cell service in this area is spotty at best. Dogs are allowed on the river but glass is not. NO GLASS of any kind! Remember your PFD and trash bag, and please do your part to leave no trace. Watch the weather and water levels, and be safe out there. See ya on the river!