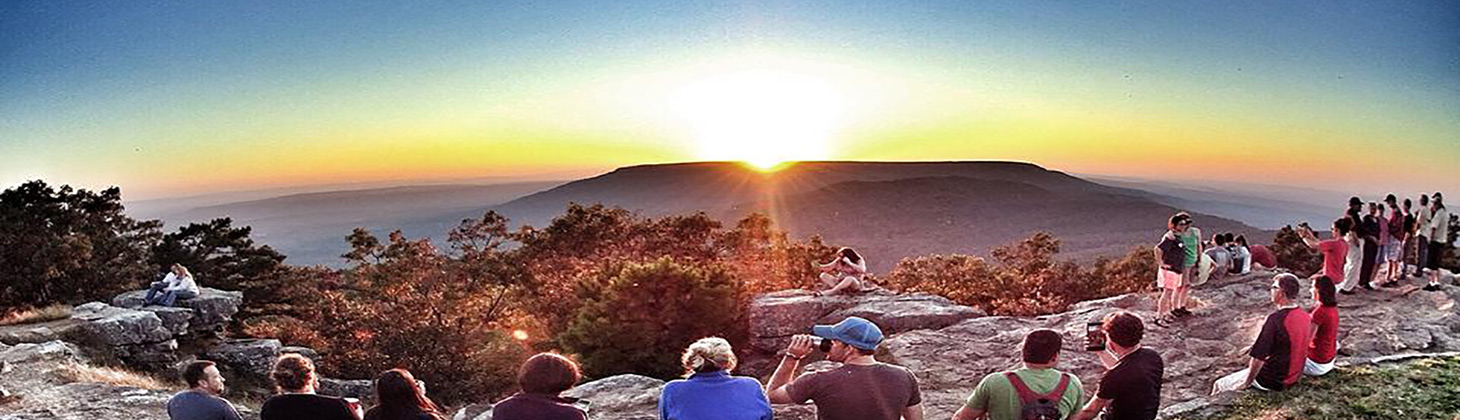
Tucked away in the rolling hills and verdant valleys of the southern Ozarks, lies a tiny mountaintop community aptly named Lost Corner. As it’s name implies, it is an area that many people don’t know much about, if they even know it exists at all. You will not find any stores, shops, restaurants, or many signs of civilization at Lost Corner. But what you will find is a remote wilderness area rich with streams, bluffs, steep ravines, and wildlife. It’s an area I visit several times a year for it’s seemingly endless options for waterfall hikes. My most recent trip would include the hike to Ladderbucket Falls and John Mountain Falls.
For this hike, my good buddy David and I would team up once again with Gez Rogers and Super Leeds of Waterfalls in Arkansas. Gez is the creator of the Waterfalls in Arkansas map. It’s a really awesome Google map with over 500 locations marked for waterfalls and parking. If you like to hunt waterfalls, I highly recommend this tool to help plan your hikes. We have hiked around Lost Corner with Gez a couple of times before (see Lizard Log Falls, Iris Falls, Brushy Grotto Falls, and Green Grotto). I love hiking with Gez for several reasons. One of those being his extensive knowledge of Lost Corner area hikes.
My friend and fellow hiker, Travis Howk (also a contributor to Waterfalls in Arkansas), previously wrote an article on my blog about the Ladderbucket Falls hike. His was an out and back hike during a rain storm. While Travis’s article was more eloquently-written than this one, my hike there was such a different experience, that I’m adding it to the blog here as well. We took the same route as Travis getting to Ladderbucket Falls. But after that our course changed as we bushwhacked to the top of the falls, and then hiked out via the creek above. It might be a slightly shorter distance to get back, but it is not faster. And it is definitely more difficult.
Quick Glance
Distance: Approximately 5.0 miles
Difficulty: Moderate to Difficult
2WD Parking Coordinates: 35.537868, -92.796878
4WD Parking (Jobes Way) Coordinates: 35.54074, -92.79776
1 – Unnamed waterfall below ATV trail: 35.54444, -92.80044
2 – First trail fork – right turn: 35.55159, -92.79790
3 – Second trail fork – right turn: 35.55355, -92.79623
4 – Turn off trail to John Mountain Falls: 35.55230, -92.79386
5 – Turn right – cross the creek: 35.55142, -92.79332
6 – Bluffline Break to John Mtn: 35.55077, -92.79351
7 – Unnamed Fall going to Ladderbucket: 35.55010, -92.79433
8 – Ladderbucket Falls: 35.54873, -92.79472
9 – Scramble up hill to top of Ladderbucket: 35.55033, -92.79347
10 – Top of Ladderbucket: 35.54839, -92.79522
11 – Where we broke off the creek back to trail (Avoid!): 35.54659, -92.79841
12 – Briar Patch (Avoid!): 35.54726, -92.80028
Gez’s GPS Track: Click Here
(Copy/Paste Coordinates into GPS or Google Maps search bar)
Directions
From Hector, head north on Hwy 27 to Dare Creek. Immediately after crossing Dare Creek, turn right on White Oak Mountain Rd (Nfm 1301/Co Rd 1). Continue for about 12 miles and turn right onto Wilderness Trail (Co Rd 2). At about 3.4 miles, you’ll see Jobes Way on the left. Park here if you’re not comfortable driving up Jobes Way to the 4WD parking area. Otherwise, continue up Jobes Way until you see a gate to private property. Park in the clearing 50 yards before the gate. If coming from the south or east of Jerusalem, there are so many routes you can take. Way to many to list here. So use the map below or GPS coordinates above to find the best route.
If you park at the 2WD parking area on Wilderness Trail, walk up Jobes Way to the 4WD parking area. From the 4WD parking area, you’ll see a gate to private property. Do not approach the gate, and stay away from the private property. Look for the ATV trail. Facing the gate, the ATV trail will be on the left. Be sure to save the GPS tracks and waypoints above, and watch the video below for visuals.
What to Expect
The Hike
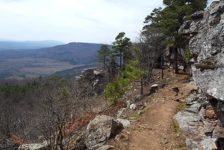
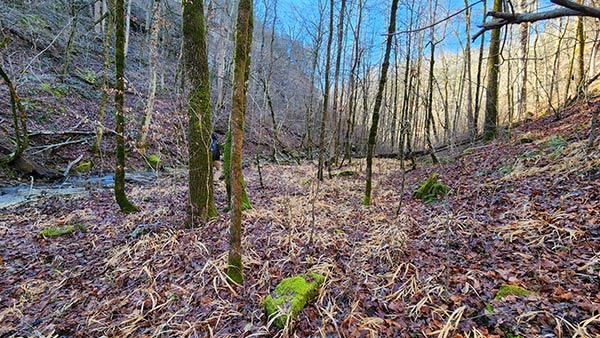
Most of the the hike is on a clean ATV trail, all the way from the parking area to the top of John Mountain Falls. Early on, the ATV trail crosses over the drainage right above an unnamed waterfall. That waterfall is waypoint #1 in the list above. For all trail forks along the ATV trail, just keep turning right until waypoint #4 above. At the top of John Mountain Falls (2 miles in), the hike becomes a bit of a bushwhack. There are some semblances of trails here and there, but nothing I would call an official trail. (By “semblance of trails” I mean you can faintly see where some people have walked). The overall out and back hike to Ladderbucket Falls is around 5 miles round trip.
The hike along the ATV trail is easy on the way out (slightly downhill), and a bit more moderate coming back. Starting at John Mountain Falls, bushwhacking down and back up the bluffline breaks are more difficult. After John Mountain, the hike through the canyon over to Ladderbucket is fairly easy. If you go back out the same way, this is a pretty moderate hike, with a difficult section of uphill hiking at John Mountain. Should you choose to bushwhack to the top of Ladderbucket and up the drainage, prepare for a difficult hike over some steep and rugged terrain. GPS is absolutely necessary for that route.
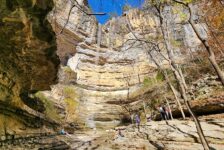
John Mountain Falls

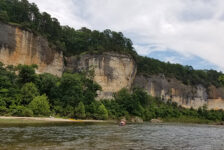
At the top of John Mountain Falls, you’ll cross the creek at waypoint #5. The bluffline break to the bottom of the falls (waypoint #6) is immediately after that, along with a great view of the majestic bluffs of John Mountain Falls. There is not an obvious trail down, nor is there a right or wrong way. Slowly and carefully zigzag your way down the hill. You’ll want to go along the cliff base towards the falls well before reaching creek level. There is a faint trail that leads you behind the falls to the grotto on the other side. This whole sequence is featured in the video below.
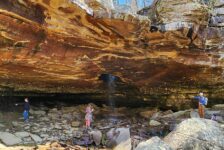
At 84 feet high, John Mountain Falls is among the tallest in the Lost Corner area. It’s so big you have to back away to get a good picture and fit it all in the frame. But then the trees get in the way, so I didn’t get great pics of this one. And it was not flowing strong that day. But the huge bluffs are so impressive, I didn’t mind. Behind the falls and under the grotto is small cave in the ground. And continuing down the base of the bluffs, there more small caves and interesting rock formations. To hike to Ladderbucket Falls from here, head down into the creek flowing out of John Mountain Falls and follow it down to the next creek.
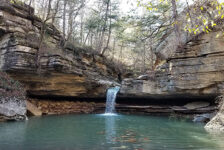
Ladderbucket Falls
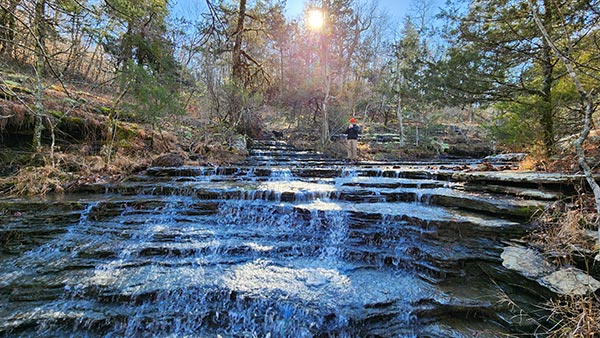
Following the creek out of John Mountain Falls, turn right at the creek it runs into. Follow this creek upstream into the canyon. This part of the hike is absolutely gorgeous. Even in Winter, the ferns, creek rocks, and water provide vibrant colors in a canyon flanked on both sides by towering bluffs. It’s a fairly easy bushwhack from here all the way up the canyon. About halfway, there are some large bluffs on the right. Here you’ll find an unnamed waterfall trickling over the high bluffs during wet season (waypoint #7). Just past that, you’ll want to cross the creek and head up the canyon under the bluffs on the left side. Follow this and the creek all the way to Ladderbucket Falls.
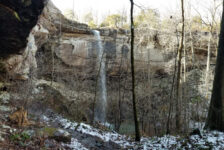
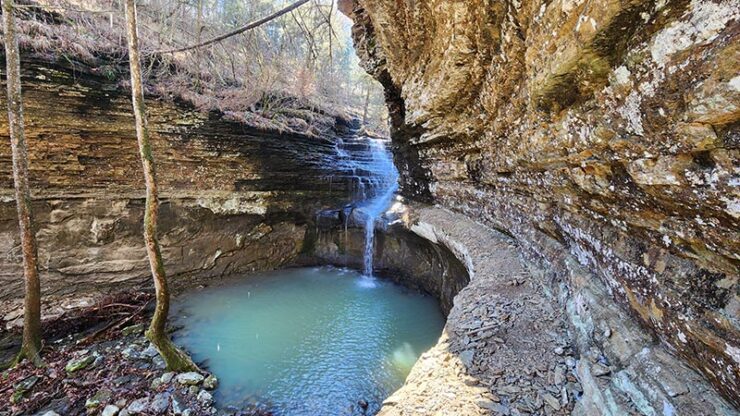
Upon reaching the falls, the canyon narrows and dead-ends into a massive grotto, encased on all sides by towering bluffs. The creek above it forms an incredible slot channel before the water cascades and twists its way over the edge. The two tiers of the falls create a mesmerizing spectacle. The top tier features a 20-ft series of cascading steps, resembling the namesake buckets. It then funnels into the lower tier as a single stream that plunges 15 feet into the emerald pool below. Along the right side of the falls is a high ledge inside the grotto. You can walk this ledge to get a different view of the falls. There are loose rocks here and the ledge is narrow so be very careful.


Bushwhack Above Ladderbucket
The easiest way back to the parking area is to simply hike out the same way you came in. But we chose to bushwhack to the top of Ladderbucket Falls and explore the upper creek. To do that, backtrack down the same creek/canyon we came in on. Before getting all the way back to John Mountain Falls, look for waypoint #9 above. At this point, you will scramble up the hill to the top of the bluffline. Again, there is no trail nor is there a right or wrong way. Once at the top, walk along the top of the bluffs, through the woods, back towards Ladderbucket. Stay close to the bluffline, navigating to waypoint #10. Once there, carefully make your way down the hill to the creek. The rocks are very slick at the top, so don’t get too close to the edge! This entire sequence is also featured in the video below.
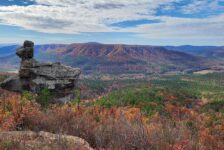
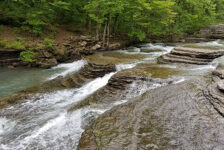
From the top of Ladderbucket, enjoy a bird’s eye view of the ravine you had just explored 30 minutes prior. To explore the upper creek, simply start walking up the shallow creek until it’s too deep. At points, you’ll need to climb up the banks and hike above the creek. I recommend going up the left side for the best views of the slot channel and cascades you’ll encounter. This part of the hike is NOT easy. It involves climbing up and down rocky embankments, often covered in moss or thick vegetation. It’s tough hiking, but the payoff is well worth the effort. You will see a slot creek reminiscent of Brushy Grotto Falls, multiple cascades, emerald pools, and beautiful moss and vegetation. As I say in the video, scenes like this are why you do the tough hikes.
Back to the ATV Trail
At some point, you have to break away from the creek and get back to the ATV trail. You can exit the creek up the hill on the left side or up the hill on the right side. Either way, it’s a strenuous hike up a steep hill. We chose to go up the hill on the right side of the creek because it was the shortest distance to the ATV trail. If you decide to follow our GPX track linked up above, you’ll want to exit the creek either well before we did or way after. That’s because we ran into a dense briar thicket right before reaching the ATV trail. Going around it would have taken quite a while. If you choose going up the hill on the left side of the creek, be careful not to trespass into the private property on that side. The third option would be to follow the creek all the way up to the first unnamed waterfall (waypoint #1 at the top). The ATV trail runs right past the top of it. Once you hit the ATV trail, you’re home free.
Plan Your Trip
The Brock Creek/Lost Corner area is fairly remote. Plan on driving 15+ miles on dirt roads to get to most of the waterfall hikes in this area. These are pretty good dirt roads though. Four Wheel Drive is not necessary. Also don’t plan on having cell service. You might catch a weak signal here and there, but not likely. That means save all maps, waypoints, and GPS tracks before going. And I recommend using a GPS for all hikes in this area, especially this one. The main trails here are clear and pretty well-marked. But most waterfall hikes here involve getting off the main trail. And many of them will be over some pretty rugged terrain. I wouldn’t do any of these hikes in anything less than sturdy hiking boots. No tennis shoes or sandals. Also, I recommend using a trekking pole because you’ll be going up and down steep rocky hills, and rock-hopping through creeks. Plan to do this hike during the rainy season of Winter or early Spring, or after recent rainfall. If you can’t hear water falling when passing by waypoint #1, there is probably not much water in Ladderbucket.
Since it does take a while to get out there, I recommend planning multiple hikes in the area and making a day of it. To see all the waterfalls in the area, check out the Waterfalls in Arkansas map. Click on each one to find links with information. Also, click here to see all the hikes in the Lost Corner that we have on the blog so far. Hint: This one is just down the road from Schoolhouse Falls and Lizard Log Falls. Because most hikes in this area require some bushwhacking, I don’t hike the area too late into Spring. Once it’s fully green, the vegetation can get pretty thick. So if you go in late Spring, use plenty of bug spray. Most hikes in this area are pretty far from anything. So take food and water with you. Just be sure to pack out what you pack in and leave no trace. Take only pictures and leave only your footprints. Enjoy the hike!